- Enable network access for your computer to the
- From your computer, connect to the
- At the login as prompt, type cs-admin.
- At the password prompt, type the cs-admin password that you created during the initial
The default cs-admin password is password.
- On the Clearswift Server Console menu, select Open Terminal Session, and then press OK.
- Re-enter your cs-admin password at the password prompt.
- At the $ prompt, type the following command:
sudo su -
Once you re-enter your cs-admin password at the password prompt, you can now enter commands with root privileges.
- At the # prompt, create a subdirectory /tmp/CA by typing the following command:
mkdir /tmp/CA
- Switch to the /tmp/CA subdirectory:
cd /tmp/CA
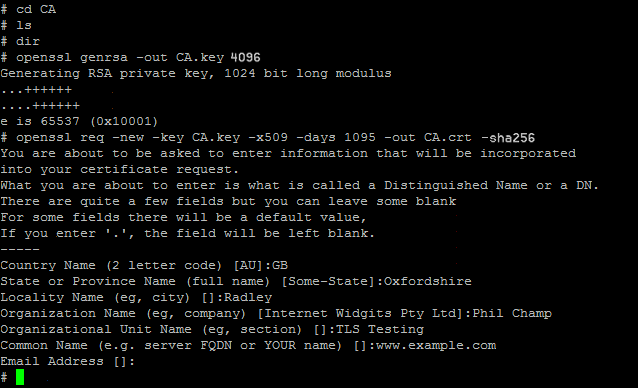
- Use the OpenSSL utility to create the CA's private key:
openssl genrsa -out CA.key 4096
- Create the CA's signing certificate:
openssl req -new -key CA.key -x509 -days 1095 -out CA.crt -sha256
This command will prompt for the following X.509 attributes of the signing certificate:
- List the files in the current directory (type ls) to confirm that the signing certificate (CA.crt) and CA private key (CA.key) files are present in the /tmp/CA directory.
If the files are present, you have successfully created a Certificate Authority on the
You can now self-sign your TLS certificate by using the
- Copy the CSR file emailgateway.csr to the /tmp/CA directory by typing the following command:
cp /root/emailgateway.csr .
- Type ls to confirm that the CSR file emailgateway.csr is present in the /tmp/CA directory.
- Authorise the TLS Certificate Signing Request:
openssl x509 -req -days 365 -in emailgateway.csr -CA CA.crt -CAkey CA.key -CAcreateserial -out emailgateway.crt
- List the files in the current directory (type ls) to confirm that the signed certificate file emailgateway.crt is present in the /tmp/CA directory.