If you do not want to purchase a digital certificate from a third-party certificate authority (CA), or if you want to use digital signing immediately, you can create your own self-signed certificate.
| Self-signed certificates are not recommended for production use. |
Before you begin
Follow the instructions to Create TLS private key and CSR.
Once you have done that, you will have the following two files in the /root directory of the
| File name | Description |
|---|---|
| emailgateway.key | Your private key. |
| emailgateway.csr | Your Certificate Signing Request. |
Self-sign the certificate
- Connect to the
 Show me
- Log in to Red Hat Cockpit.
- Navigate to the Terminal tab.
- Assume root privileges using the sudo su command.
- Create a Certificate Authority (CA) on the Show me
- At the # prompt, create a subdirectory /tmp/CA by typing the following command:
mkdir /tmp/CA
- Switch to the /tmp/CA subdirectory:
cd /tmp/CA
- Use the OpenSSL utility to create the CA's private key:
openssl genrsa -out CA.key 4096
- Create the CA's signing certificate:
openssl req -new -key CA.key -x509 -days 1095 -out CA.crt -sha256
This command will prompt for the following X.509 attributes of the signing certificate:
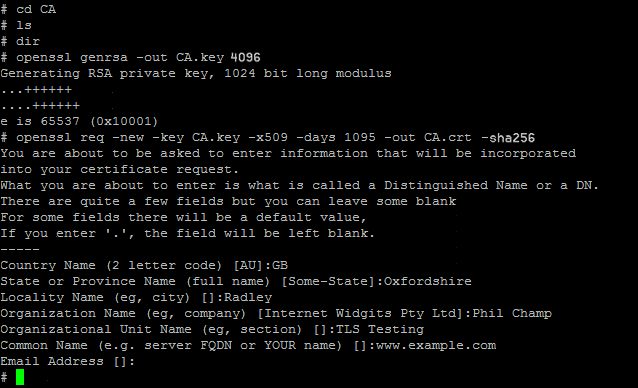
- List the files in the current directory (type ls) to confirm that the signing certificate (CA.crt) and CA private key (CA.key) files are present in the /tmp/CA directory.
If the files are present, you have successfully created a Certificate Authority on the
- At the # prompt, create a subdirectory /tmp/CA by typing the following command:
- Self-sign the TLS certificate
Show me
You can now self-sign your TLS certificate by using the
- Copy the CSR file emailgateway.csr to the /tmp/CA directory by typing the following command:
cp /root/emailgateway.csr .
- Type ls to confirm that the CSR file emailgateway.csr is present in the /tmp/CA directory.
- Authorise the TLS Certificate Signing Request:
openssl x509 -req -days 365 -in emailgateway.csr -CA CA.crt -CAkey CA.key -CAcreateserial -out emailgateway.crt
- List the files in the current directory (type ls) to confirm that the signed certificate file emailgateway.crt is present in the /tmp/CA directory.
- Copy the CSR file emailgateway.csr to the /tmp/CA directory by typing the following command:
When you have finished
You now have three TLS certificate and private key files that you can import into the
| File name | Description | Directory |
|---|---|---|
| emailgateway.key | Your private key. | /root |
| emailgateway.crt | The self-signed TLS certificate. | /tmp/CA |
| CA.crt | The |
/tmp/CA |
Once you finish setting up your self-signed certificates, you can log out by typing logout twice. This returns you to the Clearswift Server Console menu, which you can exit by pressing Exit.